This is my first tutorial. I hope I explain it well. If you have any questions or comments, please let me know.
I first saw this effect on a Facebook group that shared a video done by Make Productions based in London. The video was for the World Wildlife Fund, and the effect is very dramatic. It mimics slow motion in video, all done by manipulating still photos.
Click here to see the video. Dusting off some digital pictures I took with a few friends of mine over 8 years ago, I felt that the effect could have a strong impact in a similar sequence.
Photoshop
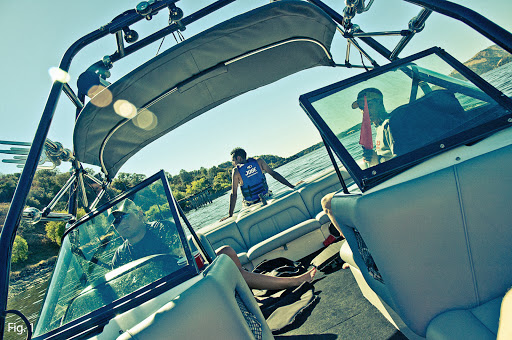
Here is the original photo that we will work on. Fig. 1
You want to start with a photo that has already been edited ie. dust removed, retouched, color corrected etc. That way as you start to break the image into the different layer elements you do not have to correct each one.
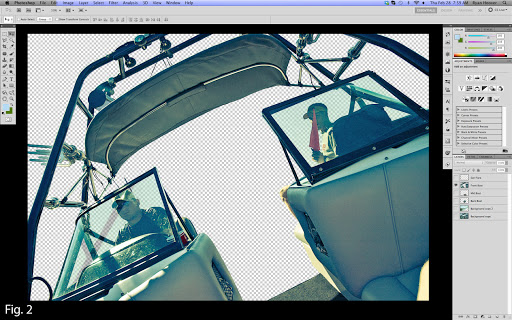
Then using the pen tool in Photoshop you want to begin selecting your foreground elements. Fig. 2
After making each selection I like to create a layer mask since that is non-distructive to each layer until I have completed the image, at which point I delete the hidden content on each layer. (Just my personal preference, though it is ok to leave the layer mask in place.) Each selection needs its own layer. In this image I have the 5 layers. The lens flare, front, middle and back of the boat and the background layer.
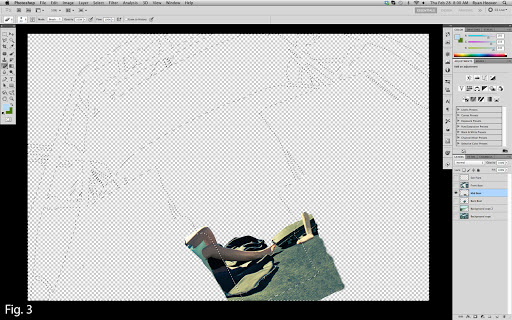
After you have separated the elements of the scene into layers, the next step is to extend the content behind the layer in front of it. As you can see in fig. 3 the selection showing is of the front of the boat. Using the clone tool and some creativity start painting beyond the original layer. You can see where I have painted the extension of the floor and legs in the middle of the boat.
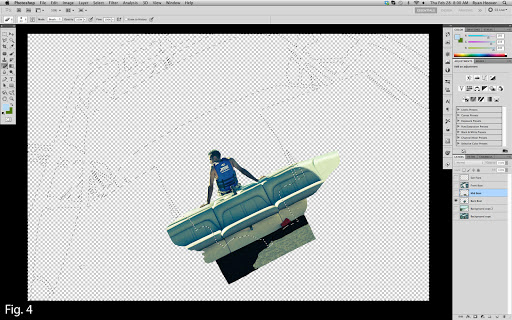
The same thing is done to the back of the boat layer. Painting beyond the edges of the layer in front (Fig. 4) the floor, back bench and side of the boat have been added.
For the sun flare, because of its transparency, using the eyedropper I selected the color of each circle and painted it on a new layer with varying opacity. I used a separate layer for each part of the flare and then merged all of them into one final unified layer.
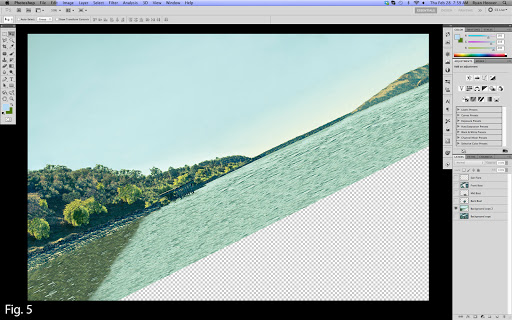
The final step in Photoshop is to then paint in the background image to cover everything that will sit on top of it. Fig. 5
Save your image as a PSD, we will be able to import the layers into After Effects all at once.
In all of these preceding steps you can be as precise as you want. The closer you pay attention to detail now, the cleaner it will look in the final clip.
After Effects CS5
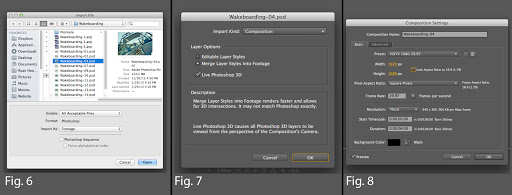
Our first step in After Effects CS5 (or 6) will be to import our PSD file – File>Import>File (Fig. 6) After locating your PSD file select open. The following dialogue box in Fig. 7 will appear select the options as shown, press ok. This will open your PSD file and create a timeline. The next thing we need to do is to adjust the composition settings to make them more video friendly since your picture is likely much larger than full HD at 1920×1080 pixels. Select Composition>Composition Settings… and you should see something like Fig. 8 where you can adjust the width and height of the composition.
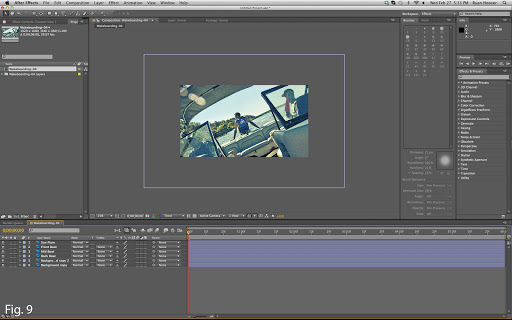
Fig. 9 is our workspace. You can see the layers already on the timeline across the bottom our composition preview in the center. The purple bounding box around the composition in the center shows us the scale of our layers, we’ll adjust that in just a moment.
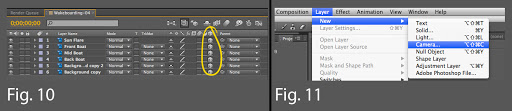
First lets go ahead and turn our layers into 3d objects. click all of the empty boxes under the 3d Layer icon (the little cube in Fig.10). Now we need a camera to move through this composition of 3d layers. Go to Layer>New>Camera…
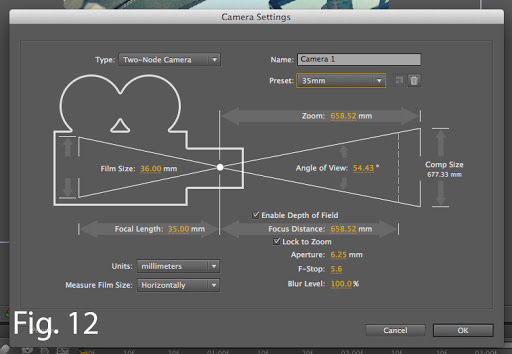
This is the Camera Settings dialogue box. There are many things that we can play with here, however simply selecting the 35mm preset from the drop down box will do for this tutorial. Fig. 12
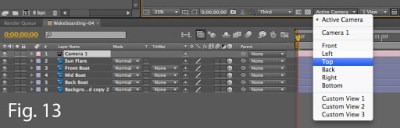
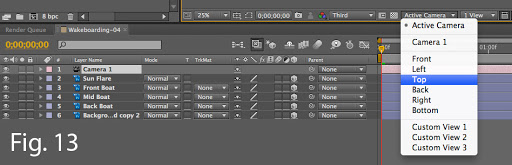
At the bottom of our composition window select the Active Camera drop down and select Top for our composition view. Fig. 13
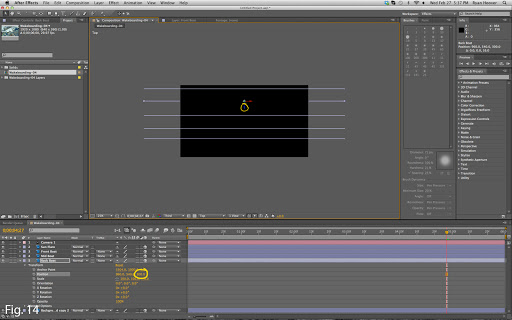
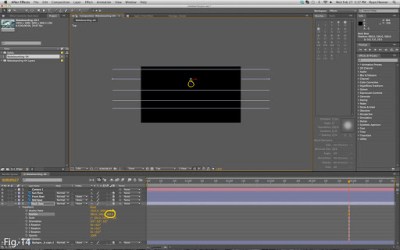
In this new view we are looking down on top of our layers, only at first you will only see 1 purple line crossing the preview window. This is because all of your layers are in the same plane. There are several ways to position your layers on the ‘z’ axis. In the timeline window (Fig.14) if you select any given layer, in this case ‘Back Boat’ layer under the drop down options for Transform is an option for Position. the third column to the right is for the Z axis, or distance from the camera. By changing the number in this column you will see the purple bounding box for that layer move up or further from the camera, putting it in the background. Alternatively, with the layer selected you can click on the blue Z handle in the composition window and move it to the distance you want it to be. After positioning all the layers appropriately you should have something that looks similar to that of Fig. 14.
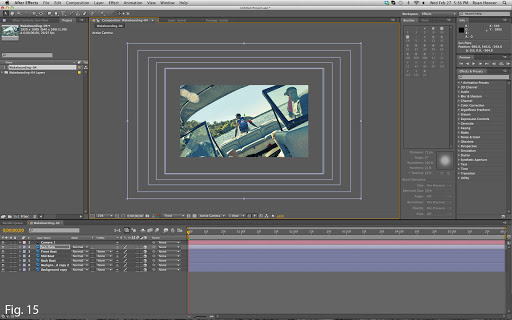
Now switching back to the Active Camera view, we see that the layers in our scene are different sizes. Fig. 15. Actually they are the same size, only some are closer to the camera view than others. We now need to scale these layers from the camera’s perspective to take in account for their depth.
Select all of the layers in the timeline not including the camera. to select all of the layers we need for this you can either click on the top layer and ‘shift+click” the last layer we need or you can click in the empty space below the layer names in the timeline and drag up and release on the top layer needed. With all layers selected press the ‘S’ key, this will reveal the Scale option under each layer.
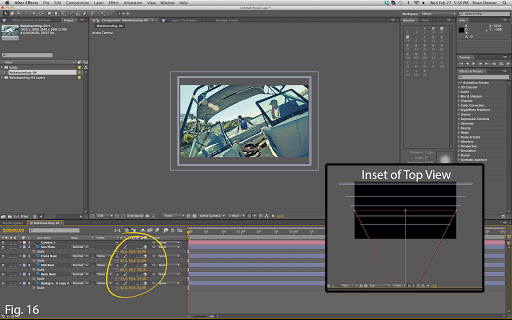
Now select one layer in the timeline, when you do you will notice the handles that appear in the corners and along the sides of the layers bounding box. Click on one of the handles and then press ‘shift’ to constrain the aspect ratio and drag the handle to adjust the scale of the layer. The goal is to have all of the layers roughly the same size in this view. In Fig. 16 you can see the varying scale from 56% to 75% and you’ll notice the background layer is a little larger than the other layers. This is because we want to make sure that we are not shooting off the background as we start to move the camera. In the inset of Fig. 16 you can see the top view now that we have adjusted the scale of the layers. All of the layers extend just past the red lines indicating the angle of view from our scene camera.

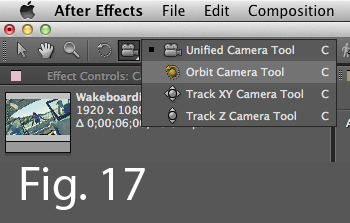
Now we are ready to start animating. Clicking on the little camera icon in the tool bar along the top select the Orbit Camera Tool. Fig 17 Select the camera layer in the timeline and then you can click in the composition window and drag the scene in 3d perspective.
Opening the drop down options under the camera layer will reveal point of interest, position, rotation options for all axes as well as options for zoom, focal distance, aperture and more. To be safe, I like to select all of the little stopwatch icons under the camera, so anything I change will be marked by a keyframe.
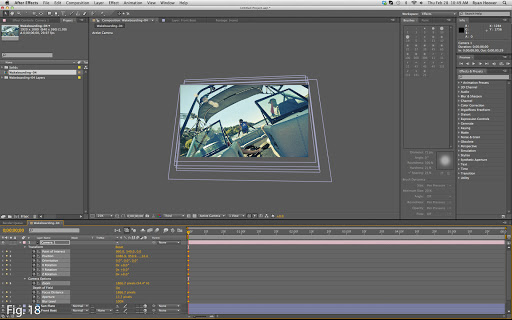
In Fig. 18 I have positioned the camera at a low position, with the horizon close to the back of the boat. I have set all the stopwatches so any changes to the camera position or camera options such as zoom will be captured. Now drag the Current Time Indicator to the end of the timeline, nothing has changed because we need to set a new position for the camera to be at and create its new keyframes.
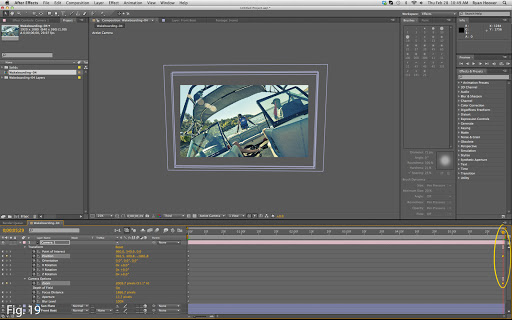
Now I have dragged the composition window using the Orbit Tool to appear as the camera has moved up away from the floor of the boat an you can see more water behind the boat now. I have also zoomed in just slightly notice the two new keyframes at the end of the timeline indicating that something has changed. Fig. 19
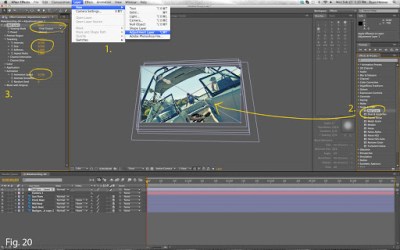
There is just one last thing to add to this to make it look a little more authentic. Noise & Grain. Fig. 20 Go to Layer>New>Adjustment Layer. Next in the Effects & Presets panel on the right open the Noise & Grain toggle and drag the first option, 16 bit Add Grain, onto the adjustment layer by simply dragging and dropping it on the composition window. Then in the Effects Controls panel on the left of the workspace I changed the Intensity and the Size, under the Tweaking drop down, to 0.75. I also changed Animation Speed in the Animation drop down to 0.75 as well because I felt it was not subtle enough. I did not click the Stopwatches next to those options since I wanted those settings to be constant throughout the clip. The final change was to the Viewing Mode, setting that to Final Output removes the small grain preview box from the center of the composition which will render with the video if it is not changed.
You are now ready to Render out the video.
A Last Word
Since the only file we used in After Effects was our PSD file, you can go back into Photoshop at any time if you notice some strange ghosting or other artifacts that need to be removed. Then just reopen After Effects after saving the PSD and your changes will be updated.
Now
here is the finished clip.
Now please enjoy this series of wake boarding shots.
Parallax Wakeboarding from Ryan Hoover on Vimeo.

 In this new view we are looking down on top of our layers, only at first you will only see 1 purple line crossing the preview window. This is because all of your layers are in the same plane. There are several ways to position your layers on the ‘z’ axis. In the timeline window (Fig.14) if you select any given layer, in this case ‘Back Boat’ layer under the drop down options for Transform is an option for Position. the third column to the right is for the Z axis, or distance from the camera. By changing the number in this column you will see the purple bounding box for that layer move up or further from the camera, putting it in the background. Alternatively, with the layer selected you can click on the blue Z handle in the composition window and move it to the distance you want it to be. After positioning all the layers appropriately you should have something that looks similar to that of Fig. 14.